User flows chart how visitors navigate your site to uncover opportunities to reduce friction.
All well-structured websites have one thing in common: Their design process considers flow as much as visual detail. But to do that, you must first understand how people experience your site as a whole.
User journeys provide a high-level view of how visitors move through the interface, while user flow diagrams highlight key decision points and interactions along the way. When you understand how users navigate your website, you’re better set to fine-tune each step and optimize the overall experience.
What’s a user flow?
A user flow is a visual representation of the precise steps people take as they journey through your website. It includes important decision points, like signing up for a newsletter or completing an onboarding sequence, and reveals how users interact with your site along the way. It’s more of a diagram than a document, but not as fully fleshed out as a UX wireframe.
Including user flows early in the design process gives you the context to define how small-scale interactions should occur, before you begin creating other elements, such as the layout or visual hierarchy.
User journey vs. user flow
User journeys and user flows serve similar, yet subtly distinct, purposes in UX design:
- User journeys (or customer journeys) capture the big picture. They illustrate the full experience, from a visitor’s entry point to exit, and often include emotions, touchpoints, and areas of friction users may encounter along the way.
- User flows focus on the step-by-step actions visitors take, the specific paths they follow as they interact with your site. They’re more detailed and task-oriented than experiential, and ideal for charting specific routes and user choices.
Together, user journeys and user flows give perspective and precision to designing web experiences that make sense at every level.
Why are user flows important?
User flows help designers turn a tech specs document into a real, actionable UX design process. For example, you might plan to make a homepage that “excites users about the product and invites them to create an account.” A user flow diagrams how to make that happen by mapping the actions they’ll take, the decision points they’ll encounter, and the UI interactions that guide them toward creating an account.
Well-structured user flows set the foundation for better UX and lead to several benefits, such as:
- Stronger collaboration: A visual map offers a shared reference for discussing and refining decisions as a team.
- Smarter wireframing: When building a wireflow, your user flow serves as the outline for each screen and state along the path.
- Clearer communication: User flows are a great way to show what you’re building and why, which is especially helpful when presenting to non-design teams or stakeholders.
- Better user research assets: User flows can guide early prototypes for card sorting and tree testing to validate your design decisions with real users.
How to create a user flow
User flows happen early in the design process, before wireframes, UI elements, or mockups. The challenge is to turn abstract ideas into a visual sequence of screens, actions, and decision points. It may feel daunting to imagine how your finished website will work, but remember, a user flow is meant to evolve — you can always revise it as your design takes shape.
To get started, choose one interaction with a clear entry point and objective, like signing up for an account or navigating from the homepage to account settings, and follow this process to turn it into a visual user flow diagram:
1. Set up a simple design system
Choose a digital whiteboard or diagramming tool like Figma or LucidChart, and create a dedicated page for your flow elements. Define reusable components, like rectangles for screens, diamonds for interactions, and arrows for direction. A consistent system makes every new flow faster to build and easier to follow.
2. Define the user’s objective and main path
Create a new page and add a brief description of the task your flow represents, such as “onboarding new customers” or “navigating to privacy settings.” Next, drag in your prebuilt shapes and label them (for example, “homepage,” “sign-up modal,” and “email verification”).
3. Add interactions
Place interaction shapes between your screens to represent user actions, like “click sign-up button” or “enter email address.” Many designers use diamonds, but you can use whatever shapes make the interaction clear to you. You can also color-code them to distinguish between on-site actions and external tasks, like confirming an email.
4. Connect the steps
Use arrows to connect the interaction shapes in the intended order. If there are optional paths or skips, draw separate lines to show those possible routes. Label each variation clearly so it’s easy to understand where and how the user’s path might change.

The modern web design process
Discover the processes and tools behind high-performing websites in this free ebook.
User flow diagram examples
Below are three user flow examples by UX writer Rob Harper. They’re slightly more developed than typical flow diagrams, but the core structure is the same. If you have design assets ready, you can achieve a similar level of detail. If not, a simpler diagram still maps paths and decision points well enough to guide early planning.
1. Approving an access request
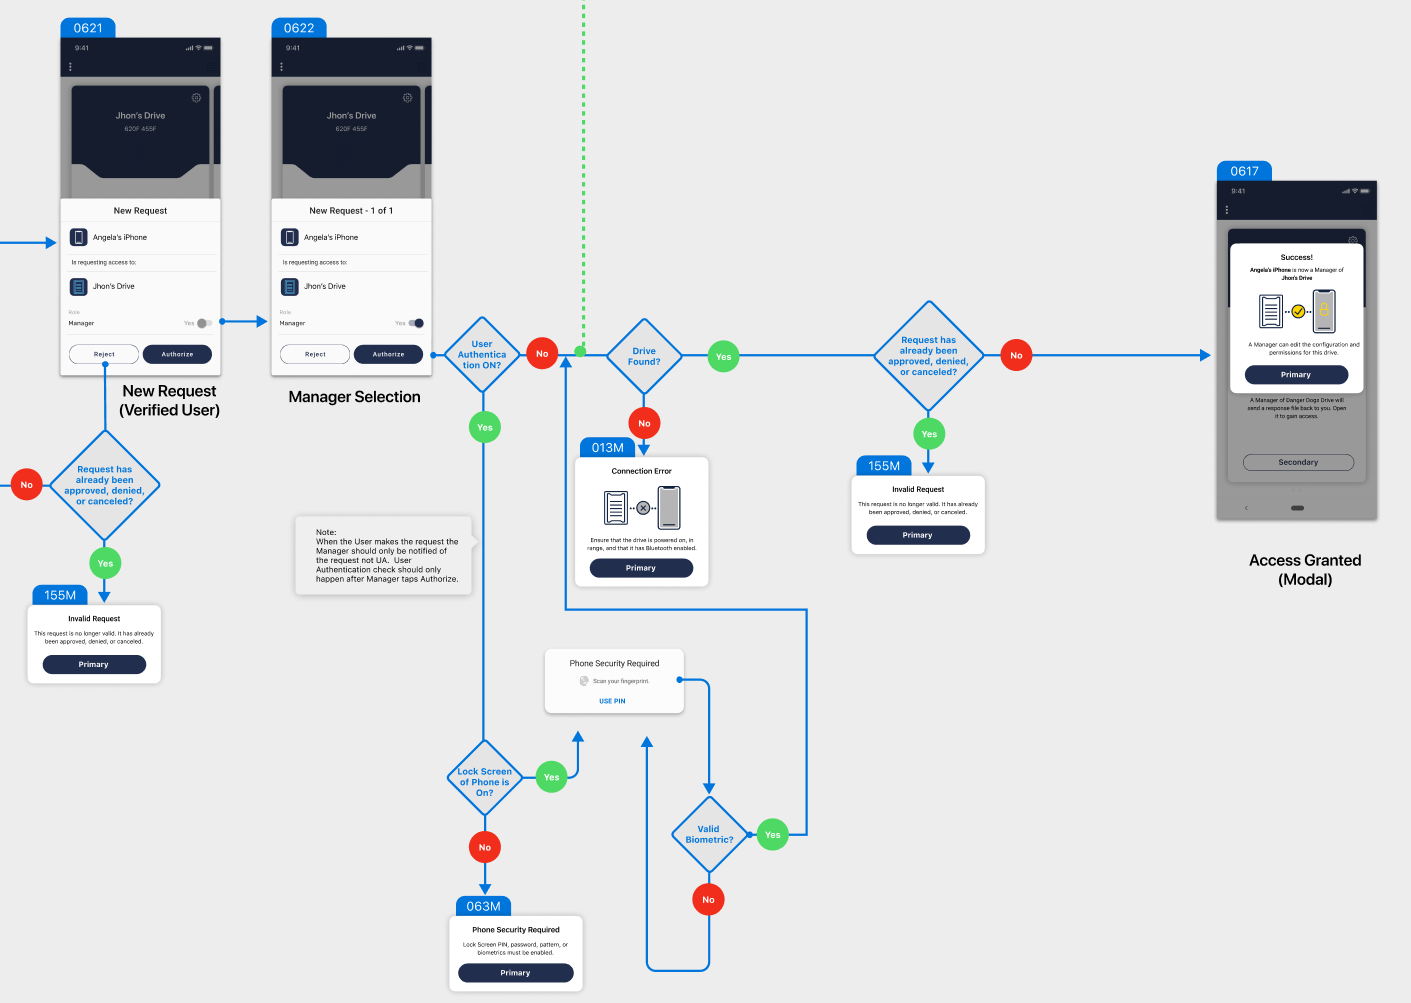
ArmorLock is a firmware-locked storage device that HBO and Disney film crews use to securely store raw footage. Its companion app lets managers approve access requests and assign permissions.
In this user flow, a manager authorizes another user’s request to access a drive. The flow includes several decision points, such as whether the user has already been approved, whether biometric authentication is enabled, and if the drive is connected. Color-coded markers and connected screens visually map the steps needed to grant access successfully.
2. Connecting a device
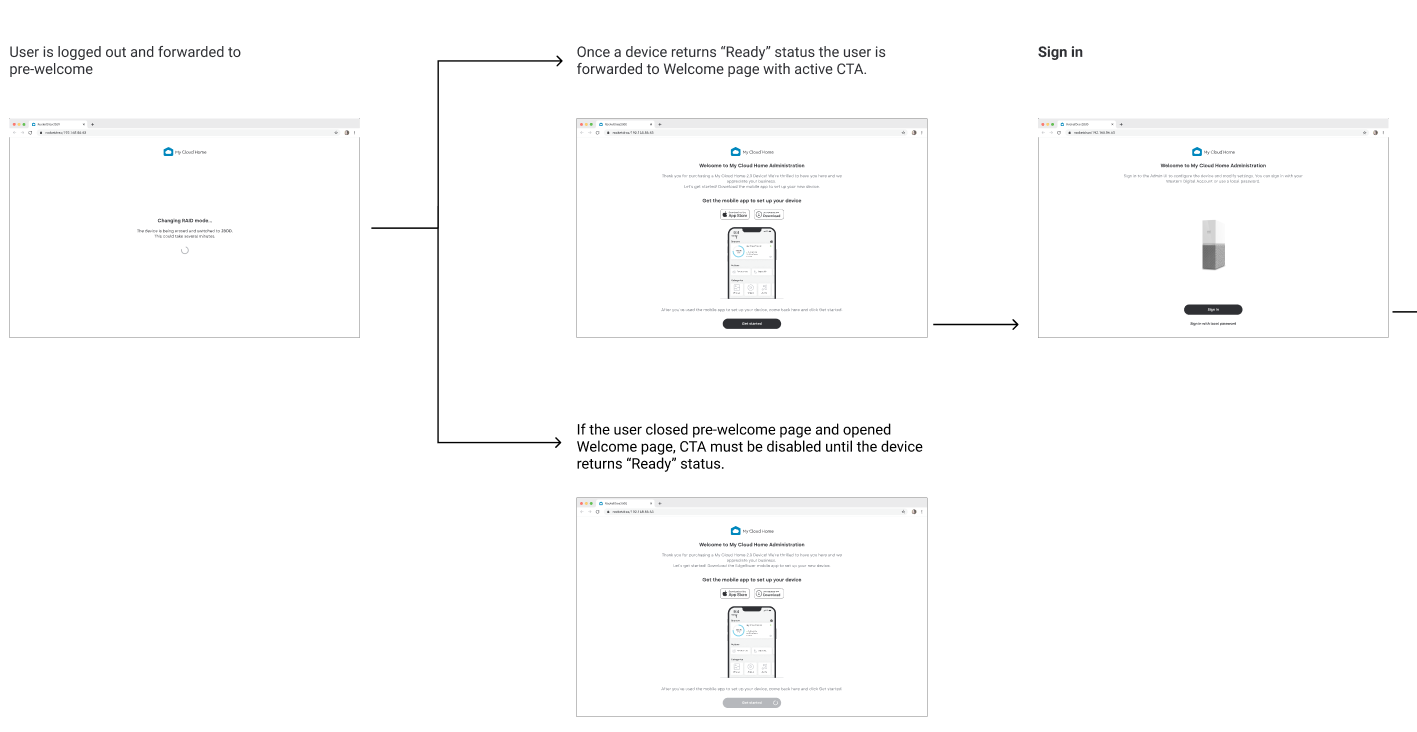
This user flow maps how to sign in to My Cloud, a home server that connects to users’ devices via the cloud. It shows the ideal entry point for the best user experience and what happens when users stray from that path. For example, closing the pre-welcome screen before the device reaches “ready” status disables the sign-in CTA, preventing access until setup is complete.
3. Onboarding

EdgeRover consolidates media libraries across cloud storage platforms, with a personalized onboarding flow as one of its standout features.
These screens show part of that experience, where users select how they use their devices and what they want help with, such as backing up data, editing content, or organizing photos. Based on their responses, each branching line leads to a screen where the interface adjusts to match the user’s goals, creating a customized experience from the start.
Design journeys that keep users moving
You can create user flows with almost any tool that lets you draw shapes, add text, and apply color. For apps, digital whiteboards like Figma or Sketch are a solid choice. In Webflow, you can design user flows directly on the visual canvas, using the same components and text styles you’ll carry through to your final UX.
Already have a user flow in Figma? You can easily import it with the Figma to Webflow plugin.
Turn your user flows into functional sites with Webflow.

Build websites that get results.
Build visually, publish instantly, and scale safely and quickly — without writing a line of code. All with Webflow's website experience platform.