


Bake SEO into your building practice
Structure pages with HTML5 semantic tags
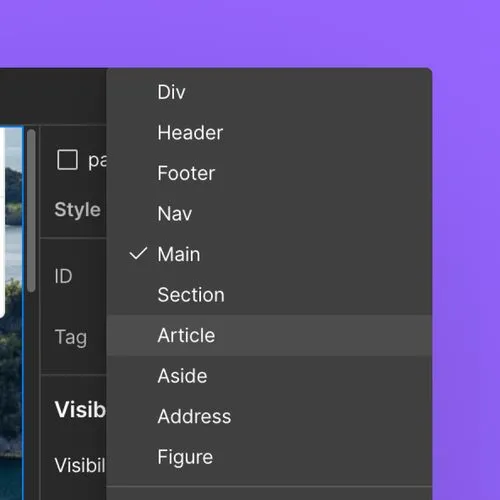
Semantic HTML tags are elements in HTML that convey the meaning and structure of the content they enclose. In Webflow, you can add various semantic HTML5 tags to your elements from the Element settings panel.
Select the HTML tag that best describes the content’s purpose (e.g., use <article> for independent content, <section> for grouped content).
Organize your HTML to reflect the logical structure of your content, using tags like <header>, <nav>, <main>, <article>, <section>, <side>, and <footer>
Utilize <h1> through <h6> tags to create a hierarchical structure for your headings, ensuring they are used in order and not skipped. Use Webflow’s Audit Panel to see if you’ve skipped any heading levels.
- Heading hierarchy: Use headings in a hierarchical way with H1 being the highest level used for the most important topic of the page, H2s for subheadings, H3s for sub-subheadings and so on, in order of descending importance.
- One H1 per page: There should only be one H1 tag per page, at a maximum and minimum. This should represent the main title or purpose of the page.
- Accessibility: Consider how screen readers will interact with the content.
- Do not use headings only for design purposes.
- Note: If needed for design purposes, we recommend styling semantic non-heading text elements, like paragraph or text blocks, with classes. This will allow you to make these visually look like headings, while preserving semantic heading tags for accessibility and SEO.
- Avoid skipping heading levels (e.g., going from an H2 to an H4)
Limit the use of non-semantic tags like <div> and <span>, opting for semantic tags that instead convey meaning.
When semantic HTML elements are not available, use custom attributes to add ARIA roles that describe the function of elements for assistive technologies.
Ensure that your semantic HTML works correctly on various devices and browsers.
Add alt text to images
Alternative (alt) text is a textual description of an image embedded in a page.
You can use Webflow’s Audit Panel as a way to scan your pages and identify images that may be missing alt text. Note: The Audit Panel does not check alt text for images inside Lightbox media elements. Additionally, the Audit Panel does not check alt text for CMS-bound images. Please take care to ensure you’ve included alt text for any images inside Lightbox media elements and images you’ve connected to the CMS. Learn more about setting alt text on CMS-bound images.
Alt text should not be used for purely decorative images that do not add informational value to the content. In these cases, it’s best to mark them as decorative so that screen readers will skip them.
Images added to the Asset Manager have their alt text set to “descriptive” and Image elements default to “Use Alt text from Asset.” This means for images with context, you should define the alt text in the Asset Manager so there’s always something to fall back on. Then when needed, you can override specific instances of the image (e.g., mark as decorative if not being used descriptively, or set unique alt text if that specific instance is describing a different context.)
Clearly describe the content and function of the image in a concise manner. Keep alt text descriptions to a maximum of 125 characters or less.
If an image shows a picture of the Webflow CMS opened to a Collection settings, provide alt text like “Webflow dashboard with CMS Collection settings” instead of “screenshot of Webflow.”
Incorporate relevant keywords to improve SEO, but avoid keyword stuffing. The primary goal is to be informative.
You don’t need to include phrases like “image of” or “picture of” as screen readers already announce the presence of an image.
Ensure the alt text is relevant to the context of the content. Describe what is important about the image in relation to the surrounding text.
Example: If the image supports a blog post that’s announcing a new executive joining Webflow, use “Headshot of Rachel Wolan.”
For images that are functional, (e.g., buttons or links), describe the function rather than the appearance so that users, particularly those with screen readers, understand the purpose of the image and how to interact with it.
For example, for a search button, use “Search button” rather than “Magnifying Glass”.
Optimizing page settings

Create clear and intuitive page URLs
URLs serve as the roadmap to your website's content, guiding both users and search engines to the right destinations. When they are organized properly, your URL structures can enhance the accessibility of your content, improve user navigation, and boost SEO performance.
Page URLs
Slugs for static pages are managed in the Page settings for each page, whereas slugs for dynamic pages are managed at the Collection or item level.
When you create a CMS Collection item, a slug will automatically be created based on the item’s name. Consider updating the slug for brevity and clarity.
Best practices and considerations
If your page URLs undergo any changes during migration, implementing proper redirects is key to maintaining the visibility and reach of your content.
Static pages can have the same slug as a directory or subdirectory, allowing you to create an index page or landing page for that folder.
Webflow does not support the ability to give a Collection and a page folder the same slug — that is, it’s not currently possible for a single directory/subdirectory to contain a mix of static and dynamic content.

Typeform increased their technical SEO score from 48 to 95 thanks to better crawlability and overall site performance.
Create meta titles and meta descriptions for each page
In Webflow, you can define and optimize your SEO metadata per page in Page settings fields. Here are best practices to follow:
Include your primary keywords in your meta title and meta description, ensuring it reads naturally and isn’t overly stuffed with keywords.
Keep titles under 60 characters to avoid truncation in search results. Keep meta descriptions between 150-160 characters to ensure they display properly in search results.
Write clear, compelling summaries of the page’s content that meet your user’s search intent and encourage clicks.
Include your brand name in your metadata. For example, you may put About Us | Company Name.
Each page should have unique metadata to avoid duplicate content issues. For CMS template pages, you can use dynamic data in your SEO settings to pull content from your CMS item’s name or other text fields to ensure metadata is unique per CMS item.
Set up Open Graph settings for social sharing
Open Graph (OG) is a technology that social networks like Facebook, LinkedIn, X (Twitter), etc. use to pull data from your site when you share the URL of your site on those services. In Webflow, you can define your Open Graph metadata per page in the Page settings fields, reusing your SEO metadata or inputting unique OG metadata.
Many of the best practices for SEO metadata also apply for OG metadata, but it’s important to tailor your keywords and calls-to-action in the context of social sharing.
Webflow supports basic OG tags for title, description, and image. However, there are additional OG properties that you can add as custom code in the head tag of your pages.
Make sure your OG images are at least 1200px by 630px and have a 1.91:1 aspect ratio.
Use Open Graph tools like OpenGraph.xyz to test and debug OG tags for a given page.
Some platforms, like LinkedIn, do not support WebP or AVIF image file formats for Open Graph images.
If you plan to use an image for an OG image, we recommend either not compressing the image or uploading two versions — one that can be compressed, and one that can be used for the OG image.
Implement schema markup (JSON-LD)
Schema markup, also known as structured data, is a form of microdata (code) that helps search engines understand the content on your website better. For example, if you search for a recipe of your favorite food, your search results will likely include recipe cards with average ratings, total reviews, cook time, and other details — these are all pieces of structured data. There are 3 popular formats for implementing schema markup: JSON-LD, Microdata, and RFDA.
In Webflow, you can add schema markup as custom code in the Page settings for a given page. For more information about adding schema markup in Webflow, check out this tutorial.
Best practices for implementing schema markup:
When implementing schema markup, prioritize key pages first, then expand as needed. We recommend prioritizing schema markup on:
- High impact pages, like your homepage, product pages, key blogs posts, or landing pages.
- Pages eligible for rich results such as articles, FAQs, events, products, or local business information.
- Pages that drive conversions or traffic since schema can increase visibility and CTR through rich snippets.
When implementing schema markup, we recommend JSON-LD as it scales the best, especially for large scale SEO projects.
Use generator tools like Merkle’s Schema Markup Generator or Google's Structured Data Markup Helper — to format schema markup, which can simplify the process and ensure accuracy.
Before you launch a page with structured data, run it through a testing tool to ensure search engines can surface all the item properties you labeled. You can use tools like:
- Schema.org validator performs a basic check on your code to ensure it runs. You can use it on a code snippet or live URL.
- Google’s rich results test takes schema markup validation a step further. It can handle URLs or snippets just like Schema.org, and it checks the code to validate that it runs.
Always choose the most applicable types to ensure you can access all the item properties you need.
If you change the content on a page, update the relevant schema markup too.
Google occasionally updates its structured data guidelines to make new recommendations.

It’s especially powerful to pair schema markup with dynamic data in Collection Template page settings. Once you add your schema markup pattern in the custom code section, you can dynamically populate the values of your CMS fields as the value for a schema property, and automatically generate the markup across all the CMS item pages from that Collection.
Performance and SEO

Optimize images used on your pages
Optimizing image files and image behavior is essential for enhancing website and page performance, user experience, SEO, and accessibility.
Be sure to check browser support (using tools like Can I Use…) for specific file formats and review analytics about your site visitors’ browsers to determine the file formats you need.
- AVIF (AV1 image file format): Generally provides superior compression, achieving up to 50% reduction in file size compared to JPEG and PNG files without compromising quality. Supported by most major browsers, but not all. Webflow currently doesn’t support animated AVIF file format.
- WebP: Use both lossy and lossless compression techniques, offering a good balance between file size and quality, compared to JPEG and PNG. Supported by most major browsers, but not all. Keep in mind that WebP images have a 16383 pixel side length limit. And, while WebP images can optimize web page loading and storage space, not all browsers support this file format.
- JPEG: Ideal for photographs and images that do not require transparency, providing a good balance between quality and file size.
- PNG: Best for images with transparency or when lossless quality is needed.
- GIF: Suitable for simple graphics and animations, but typically results in larger file sizes compared to PNG or JPEG. Where possible, we recommend using Lottie files for animations over GIFs since Lottie files are lightweight, JSON code.
- SVG: Best for vector images and icons. SVG files are resolution-independent and can be scaled without losing quality. They are also typically smaller in size.
Reduce your file size as much as possible by compressing images; we generally recommend a max of 150kb in file size.
For images that you’ve already uploaded but haven’t yet compressed, you can use Webflow’s built-in compression tool which will compress your images into AVIF or WebP file formats.
Some browsers and protocols (such as Open Graph) don’t support AVIF or WebP image file formats, and Webflow does not natively provide fallbacks for image formats. Be sure to consider browser support and review analytics about your site visitors’ browsers to determine the file formats you need.
Ensure your image’s dimensions aren’t larger than necessary. Resize images to match the display size on your site to avoid loading excessively large files.
You can manage an image element’s loading behavior in its image settings. Your options will include the following:
- Lazy loading: Delays loading images or content until they are about to be viewed by the user, reducing initial page load time. By default, any new image placed on the Canvas will be set to lazy loading, which is generally a best practice; however, this should be adjusted for critical images.
- Eager loading: Loads all images and content immediately upon page load, ensuring all content is available as soon as the page is rendered. Best practices involve using eager loading selectively for essential, above-the-fold content and optimizing the file size and format of eager-loaded images to minimize performance impact.
- Auto loading: The default browser behavior where images and content are loaded automatically as the page loads, similar to eager loading. We recommend against using this unless you have carefully evaluated whether auto loading meets your site’s needs and can combine it with other optimization techniques, such as compression, for improved performance.
Layout shift refers to the unexpected movement of web page elements during loading, often caused by images or ads resizing unpredictably. Preventing layout shifts enhances user experience by providing a stable and predictable interface, which reduces frustration and accidental clicks. It also improves accessibility, boosts engagement and conversions, and positively impacts SEO rankings by lowering the Cumulative Layout Shift (CLS) score. Consider the following best practices to prevent layout shifts:
- Set explicit width and height: Define the width and height attributes for all images in its image settings to allow the browser to allocate the appropriate space before loading.
- Use aspect ratio boxes: Maintain the correct aspect ratio of images as they resize to create aspect ratio boxes, ensuring consistent layout spacing.
- Optimize image loading: Combine lazy loading with aspect ratio boxes or explicit dimensions to reserve space for images that load later.
- Avoid injecting images late: Include images in the initial HTML or as early as possible in the page load process to reduce layout shifts caused by late-loading images.
Optimize videos for performance
Because video files tend to be large, we recommend that you optimize the file sizes and loading behaviors for your videos according to the following best practices.
Video compression
The appropriate video file format and compression settings will vary depending on how your videos are used, and should be optimized on a case-by-case basis to ensure they don’t introduce performance issues for your site. Consider the following:
- Choose the video format based on compatibility and efficiency. For example, WebM is generally good for web use with smaller file sizes at comparable quality with other formats; however, MP4 tends to have higher video quality and greater cross-browser compatibility, but a larger file size when compared to WebM.
- Pay attention to audio optimization as part of your video file compression efforts. Remove audio data from muted videos (especially those uploaded for Webflow Background video elements) to reduce file size.
HTML video
Although Webflow natively supports video through the Background video and Video embed elements, sometimes it’s better for performance to embed your own videos as custom code.
- Background videos: Webflow renders both WebM and mp4 formats, which can slow performance if your video file is large.
- Video embeds: Additional JavaScript snippets are often loaded to support third-party media players (e.g., YouTube, Vimeo, Wistia, etc.); if you have multiple Video embeds on a page, these scripts are loaded multiple times.
Video loading behavior
To optimize video loading behavior on websites, consider implementing several key best practices for an enhanced user experience.
- Lazy loading: implement lazy loading to defer loading of offscreen videos until they are needed, which conserves bandwidth and accelerates page load times. Use a facade image or a poster frame to display a static image before the video loads, enhancing the visual appeal and preventing layout shifts.
- Preventing layout shifts: Specify the video dimensions in your HTML or CSS styles, which helps maintain the page's structure during loading.
- Autoplay behavior: Autoplay can detract from user experience by taking the choice away from your visitors, and may be detrimental for people that do not prefer motion. If you are going to use autoplay, be sure to provide users with the ability to pause the video.
Next up: Localization overview
Localization is the process of adapting your website’s content, design, and SEO settings to different languages, regions, and cultures, creating relevant experiences for global audiences.

More ways to level up
 Webflow University
Explore courses and pathways to grow your skills or prepare for a Webflow-verified certification.
Go to University Help Center
Find solutions to your Webflow questions and get help from our expert customer support team.
Go to docs Community
Connect with other designers and developers to share tips, ask questions, and show off your work.
Go to Community